Canvas Mastery Paths: Differentiating Is Grating! (Uh, I Mean Great!)
by Josh Eick, OTAN Subject Matter Expert
Have you ever experienced the following?
You have a lesson that you spent hours prepping, and when you present the activity to your class, some students struggle with the material and don’t finish in the allotted time, others do fine, and yet others sail through the material in no time and sit bored waiting for the next activity?
Of course you have.
Have you ever stopped to think about why this happens?

Bloom’s Taxonomy
Benjamin Bloom designed a graphic that depicts the cognitive processes of mastery learning. It was originally designed as a pyramid (see fig. 1) with basic learning concepts at the bottom rising to more complex cognitive learning skills at the top (LSA Technology Services - University of Michigan, n.d.).
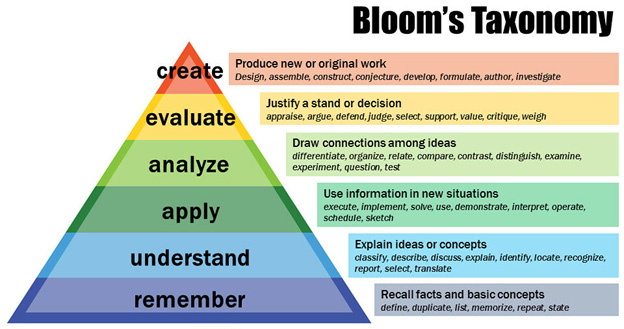
This model can help instructors to target learning objectives which describe the level of complexity of content and assessments. The pyramid represents a scaffolding concept of learning by building upon lower order levels of skills and building up to higher orders of skills (Huezo, 2019).
Since students come to class with different levels of educational experience, background knowledge, and cognitive skills, one can assume that not everyone will rise through the taxonomy model at the same speed. In addition, some students will need more hand-holding, known as scaffolding, as they rise through the more complex levels. However, a teacher’s goal should be to get everyone to the same level of understanding of the learning goal, despite their varied abilities.
So how does one do that if not everyone travels at the same speed of thought?
Differentiation
Imagine that you’re having a party and you invite friends from all over the area. No one will take the same route to get to your house nor will they spend the same amount of time to arrive there. However, everyone will eventually arrive at the same point - your house. This is the idea of differentiated learning.
Your learning objective/outcome goals are your house. Your aim as a teacher should be to get all of your students to master those learning objectives/outcomes regardless of where they lie in abilities. Your job is to meet your students where they are and give them the additional help that they need to reach that lesson goal, or challenge them if the goal is too easy. Plus, you’d obviously like to do that in a timely manner so all of the students arrive at that mastery at the same time. Otherwise, your teaching schedule would get messed up.
How does one pull off a miracle like this?
Mastery Paths
One solution is the idea of mastery paths.
Think of this concept like an obstacle course, but one with three different paths, depending on the runner’s abilities. The runners who do fine run the regular path, the runners who need help get ladders to scale the walls and less tires to run through, and the runners in the best shape get higher walls and more obstacles to overcome. The outcome is that all of the runners (hopefully) make it to the finish line in about the same time.
In the classroom, students who are doing fine do the regular exercises, while those who are struggling get more scaffolded versions of similar exercises. The advanced students get more complicated exercises or perhaps additional exercises to challenge them. All work toward the same goal and all (hopefully) end up at the same level.
This seems like a lot of extra work for the teacher, and it can be up front, but Canvas has created tools, called mastery paths, to take some of the burden off of the teacher. Plus, once you’ve created a mastery path in Canvas, you can reuse it for as long as you teach the same class or tweak it easily to use for a new class. A step-by-step video will demonstrate how to set up mastery paths in Canvas at the end of this article.
So how do you plan mastery paths? Remember the analogy of all of your party guests arriving at the same house despite their different routes? It’s the same idea.
Let’s look at three specific scenarios.
Scenario 1: History Class
Imagine that you teach a history class, and you want your students to be able to develop a road map of the events that led to WWII. The first thing that you might want to do is to assess their background knowledge of WWII as well as assess any previous material you had assigned relating to WWII. In addition, perhaps you’d like to assess their critical thinking skills. A quiz would be a good vehicle to assess where your students are at the beginning of the lesson.
Based on the quiz results, you might want to create three distinct paths: students who need a helping hand (those who score 40 points or less on the test), students who could do fine with a little help (40 - 70 points), and students who already know the basic facts and could handle more challenging material to keep them engaged (70 points and up).
The paths might look something like this:
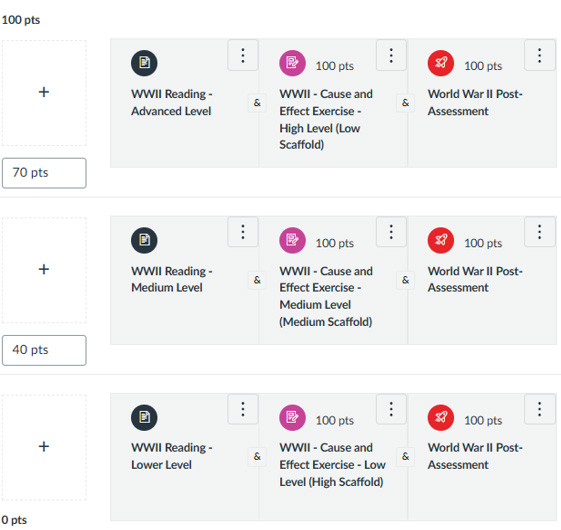
(Fig. 2 - WWII Mastery Paths)
Those scoring in the lower third percentile will be assigned an easier reading assignment, perhaps one with the events clearly organized in simple terms, along with a cause and effect exercise, like a cloze exercise where they fill in specific events in chronological order that led up to the war. They will end with a post-assessment quiz to gauge whether they understood the material with the extra scaffolding help.
Those scoring in the middle third percentile will be assigned a mid-level reading assignment, perhaps a straight-forward summary of the events that led up to the war, along with a more difficult cause and effect exercise, like creating a timeline of events that led up to the war. They also will end with the same post-assessment quiz to gauge whether they understood the material.
Those scoring in the highest third percentile will be assigned a more challenging reading assignment, perhaps an article that focuses on the main players in the events that led up to the war but not in chronological order, along with a challenging cause and effect exercise, like a chronological essay which lays out the events that led up to the war. They also will end with the same post-assessment quiz to gauge whether they understood the material.
The goal is to get all of the students to do well on that post-assessment quiz regardless of which path they took. All paths lead to the lesson’s single goal of understanding the events that led up to the war. That’s differentiation!
All of this can be easily done in a Canvas course. There will be a bit of work necessary to create the quizzes, reading materials, assignments, etc., but just like any other class prep, once you do it the first time, you can just recycle it as long as you teach the same course.
Scenario 2: ESL Class
Here’s another example for an ESL class. Let’s say that you’re going to teach a complex grammar lesson, like the passive voice. After you teach the lesson, you have everyone take an assessment quiz. This time, however, you’re going to give the students choices based on two factors: how they score on the quiz and whether they'd like to work alone or with a group.
The paths might look something like this:
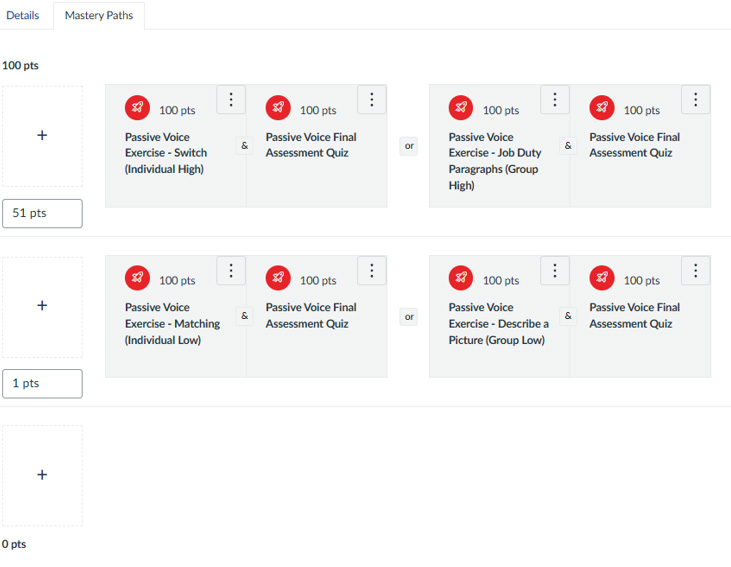
(Fig. 3 - ESL Mastery Paths)
This time, I set it up so there will only be 2 paths: one for those who score over 51 points and those who score between 1 and 50 points. (I set it up this way so there would be no third group. Anyone scoring 0 points would need special attention anyway.)
Those scoring in the lower half percentile would then have 2 options: to do a highly-scaffolded exercise individually or with a group. They would see both of the options (individual or group) upon finishing their initial quiz and would just click on the option of their choice. Those scoring in the upper half percentile would also be presented with a similar choice, although their exercises would be more challenging. If the student chooses to work with a group, you could set it up so Canvas automatically assigns a student to a specific group (if they work asynchronously), or you could just have the students sit together in the classroom to work together. Be aware, however, that once a student chooses a path, they cannot change that choice.
Notice that in all 4 scenarios, all roads lead to the same post-assessment quiz to gauge whether they understood the material. Again, the goal is to get everyone to the same level of mastery despite which path they chose.
Scenario 3: Project-Based Learning
This final scenario is a little different from the first 2 and requires a work-around to get it to work. There are several different ways to do this in Canvas, but mastery paths take care of some additional steps that the teacher would have to do manually.
Imagine that you want your students to research a health topic of their choice. They will choose a topic, read an article about that topic, and summarize 5 - 10 of the most important takeaways from the article which they’ll use to create a health presentation later in the unit.
Remember that mastery paths use the results from a quiz to assign students a path depending on their quiz results.
One thing that mastery paths cannot do at this point is to assign paths based on a survey because Canvas uses a point system to determine the next path. However, you could create a simple quiz to act as a survey and direct students along a path depending upon which answer (topic) they choose on the quiz.
While setting up the quiz/survey, keep in mind that Canvas only allows 3 possible post-quiz paths - low, medium, and high. We’re going to cheat a little to work around this. (Note: You may want to watch the video in the next section prior to reading the remainder of this section, especially if you’re not familiar with setting up quizzes and pages in Canvas.)
Let’s say that based on a class vote, 4 health topics emerge as the most popular: obesity, pregnancy, diabetes, and high cholesterol. When setting up the quiz, assign 3 possible total points (for reasons that will become apparent in a moment), display the grade as points, check the ‘do not count this assignment towards the final grade’ box as, again, this is just a survey, and assign the quiz to everyone.
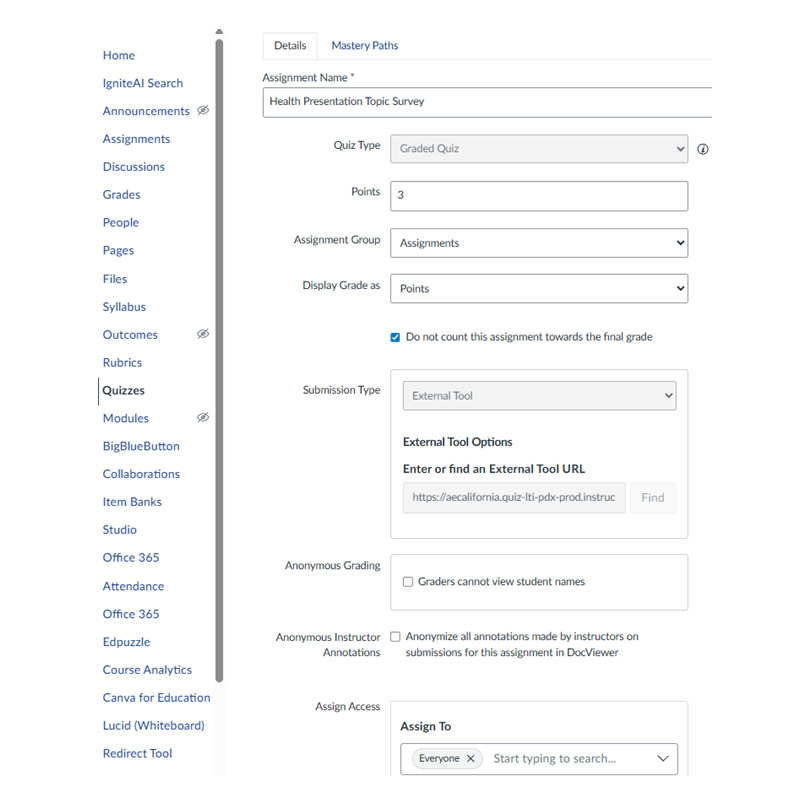
(Fig. 4 - PBL Mastery Paths #1)
Next, title and write instructions for the survey. You may want to explain the purpose of this ‘quiz’.
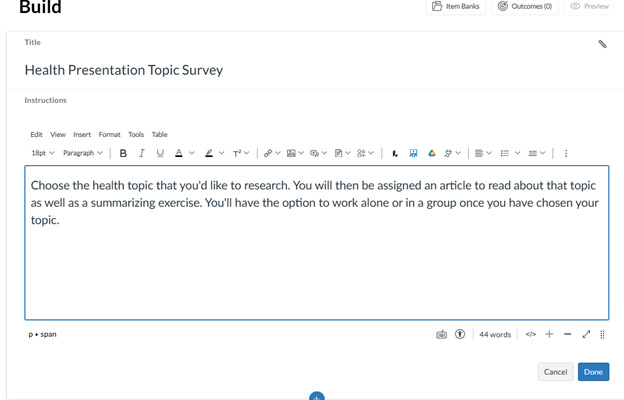
(Fig. 5 - PBL Mastery Paths #2)
After that, the quiz should only have 1 simple question: Which health topic are you interested in researching? This is the important part. Check the box marked ‘vary points by answer’ This will allow you to change the point values for each answer. Assign the first answer 1 point, the second answer 2 points, and both the third and fourth answer 3 points. Remember, mastery paths only allow 3 path options, so we’ll take care of the fact that 2 answers are assigned the same point value in a moment.
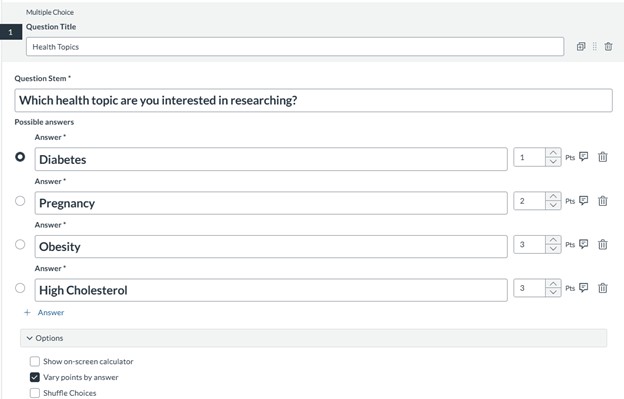
(Fig. 6 - PBL Mastery Paths #3)
Now that we have the survey, we’d create the articles that we want our students to read for each topic. In this scenario, I’d also create a summary exercise for everyone as I’d like to check their work before they use the information in their presentations which they’ll create later.
The final step is to create the mastery paths with the specific articles each group will be assigned. All mastery paths will also include the one summarizing assignment that I create as the topic will be irrelevant to assessing their summarizing skills. The highest point level should be set at 3 points, the middle at 2 points, and the lowest will stay at 0, as students who mark the 1 point answer will be assigned that path. (The lowest point value option is automatically set from 0 to one point below the middle value. In this case, 0 - 1 point.)
Remember that obesity and high cholesterol were assigned the same point value (3 points)? We can take care of that by creating an ‘or’ choice. Remember to add the additional summarizing activity to the second choice. Once the student completes the quiz/survey, anyone who chose one of those two topics can then just click on their choice and be assigned the correct article.
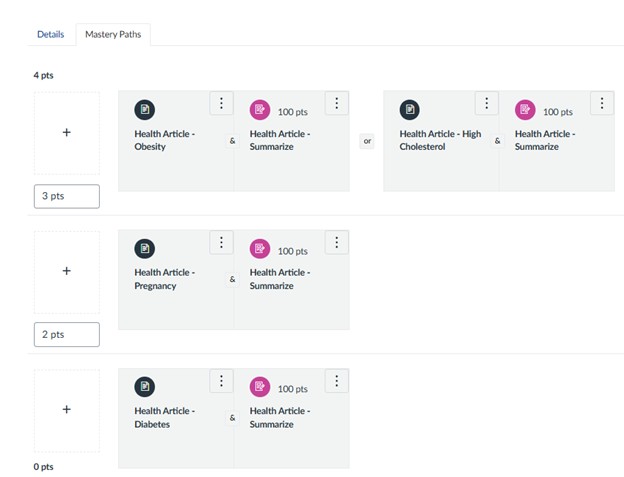
(Fig. 7 - PBL Mastery Paths #4)
This workaround lets you choose any amount of topic options. If, say, you have 6 topic options on the quiz, you assign two topics a 1 point value, two topics a 2 point value, and the remaining two topics a 3 point value. Then, you simply create an ‘or’ option for each of the mastery paths, remembering to add the assessment exercise to each additional option. Keep in mind that you can have a maximum of three ‘or’ options for each path. This would limit you to a maximum of 9 topic choices on your survey.
Setting Mastery Paths up in Canvas
Now that you’ve read how mastery paths work and how they will allow for real differentiation in the classroom, it’s time to learn how to set up a mastery path assignment in Canvas.
There’s a great Youtube video from ITCs 4 All that goes through all of the steps to setting up mastery paths. Here’s the video, but if you have trouble accessing it, click on the blue link above. That will take you directly to the Youtube website.
Good luck!!
Sources:
“Bloom’s Taxonomy for Active Learning – Learning and Teaching Consulting.” Umich.edu, 2025, sites.lsa.umich.edu/learningteachingconsulting/home/teaching-methods/active-learning/blooms-taxonomy-for-active-learning/.
Huezo, Erika. “Creating Measurable Assessments on Canvas - FIU Online Insider.” FIU Online Insider, 15 Apr. 2019, insider.fiu.edu/creating-measurable-assessments-on-canvas/. Accessed 30 Dec. 2025.
ITCs 4 All. “Canvas Mastery Paths.” YouTube, 11 June 2020, www.youtube.com/watch?v=Pd8RivVzTT8. Accessed 5 Jan. 2026.